Minting Gaming assets on Polygon using Onecdot APIs
In this article, we’ll be using Onec-NAAS, the API Suite product of Onecdot and Unity3d to NFTs on Polygon.
The benefit of building applications using APIs is that they are platform-independent. It means if your device is internet-enabled and can run API requests you can possibly build another great application.
The applications of NFTs in Gaming are definitely crazy. But one sec, what I’ll say is that you know application dev, but, you need to learn Blockchain concepts, solidity, unity, JS libraries like web3js, and another bunch of stuff if you want to start building an NFT driven game on Unity. Also, when you start building, what about the system design, your app, and blockchain integrations? And the time is taken with the costs to maintain nodes?
It’s a lot to digest. Here is where API services like Onecdot come into the picture. These are the simple APIs that offload the web3 work in their end, and let you mint NFTs and other stuff using simple APIs.
Check out the APIs Swagger docs here 👉https://api.onec.in/docs/
In this article, we’ll be using Onec-NAAS, the API Suite product of Onecdot and Unity3d to build mild interaction between blockchain and unity using Onec-NAAS APIs. Basically teaching and demonstrating how to use Onec-NAAS APIs in Unity.
And we’ll be doing this our beloved chain @0xPolygon.
Here is what you need 👇
- Unity3d https://unity3d.com/get-unity/download
- VSCode/JetBrains Rider(since it’s mostly C#)
- Onec-NAAS API key for Polygon Network https://dashboard.onec.in/ (obtaining API key is simple Dashboard Login > Add project > select chain > Add API key > Copy API jey)
- Select Polygon Mumbai to mint it on Polygon.

After installing Unity3d
There are a few steps to follow along to make your Unity tutorial ready. In this tutorial, we’ll:
- Hard code the metadata to be sent as payload
- Make a ‘MintNFT’ button to mint that data onto the Polygon chain
- Output box for the return response

To start with 👇
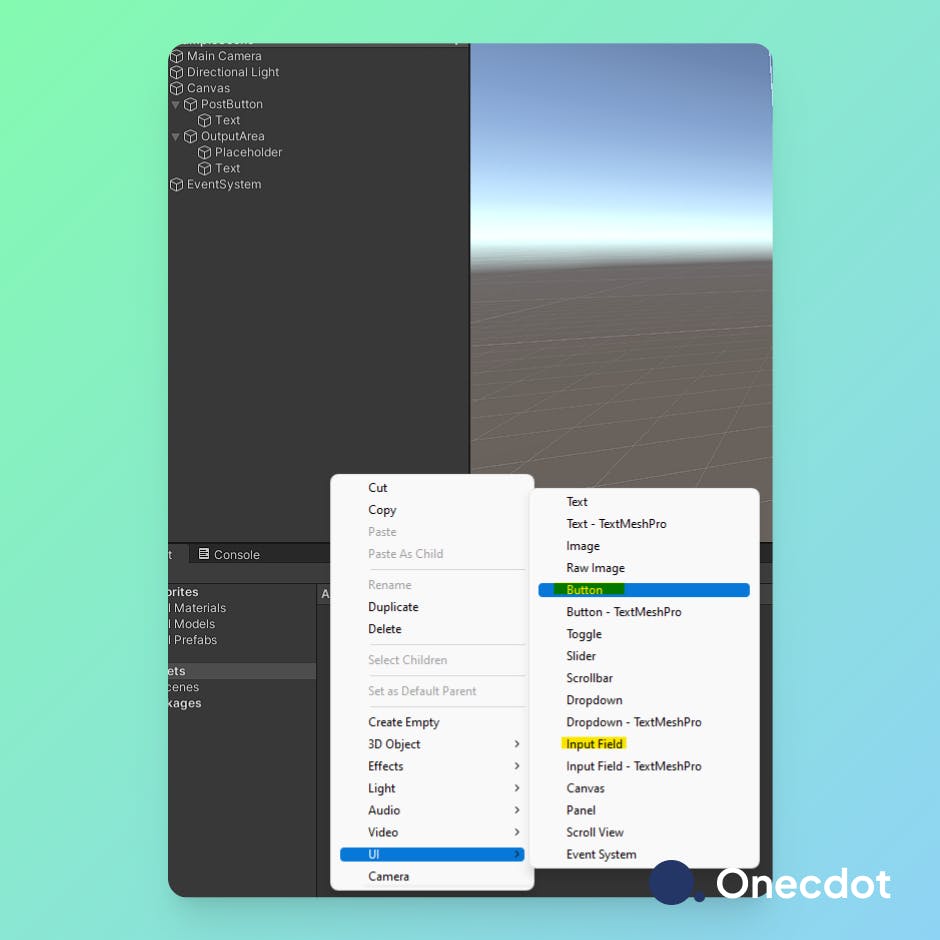
- Select canvas and Right-click on the left side pan of the Unity
- Go to UI > Button
- Follow the same procedure to add the input field

Select Button again, and on the right side pan, rename the button to PostButton and select "text" under the button to name it whatever you like. We call it "MintNFT"
- Now, select Input Field, on the right side pane, name it
OutputArea. This will be the area where the response from the server will be listed. Scroll down the same pane to find “Line Type” convert it to “Multi-Line Newline”. - You can readjust the size and position of the button and the Output Field to whatever you feel like.
These components can also be considered as gaming interactive components. Who can extend them later, as you learn Unity to make them into more advanced components?
Adding the script to the button
Now since you’ve set up your basic Unity components time is to write a script that interacts with the Onec-NAAS server to serve your requests.
- On the Bottom pane click on “Assets” and right-click on the Pane > create > C# Script
- Open this script on VSCode/Jetbrains Rider or any other text editor you’re comfortable with.
- Name the file as
PostRequest.cs - Replace
PASTE_YOUR_APIKEY_FROM_DASHBOARDwith the API obtained from the Dashboard. And0x0000000000000000000000000000000000(which is a public address of the wallet) with the address you are minting NFT to.
Add the following code to the script.
//PostRequest.cs
using System.Collections;
using UnityEngine;
using UnityEngine.UI;
using UnityEngine.Networking;
using System.Collections.Generic;


[System.Serializable]
public class Metadata
{
    public string imageURL;
    public string twitterHandle;
}

[System.Serializable]
public class MetadataList
{
    public string public_address;
    public Metadata metadata;
}

[System.Serializable]
public class Root
{
    public List<MetadataList> metadata_list;
    public string SaveToString()
    {
        return JsonUtility.ToJson(this);
    }
}

public class PostRequest : MonoBehaviour
{
    InputField outputArea;

    void Start()
    {
        outputArea = GameObject.Find("OutputArea").GetComponent<InputField>();
        GameObject.Find("PostButton").GetComponent<Button>().onClick.AddListener(PostData);
    }

    void PostData() => StartCoroutine(PostDataCoroutine());

    IEnumerator PostDataCoroutine()
    {
        outputArea.text = "Loading...";
        string url = "https://api.onec.in/api/v1/naas/mintNFT/";
        var webRequestVar = new UnityWebRequest(url, "POST");

        List<MetadataList> metadata_list = new List<MetadataList>();
        metadata_list.Add(new MetadataList
        {
            public_address = "0x0000000000000000000000000000000000",
            metadata = new Metadata
            {
                twitterHandle = "https://twitter.com/amnpandey",
                imageURL = "https://pbs.twimg.com/profile_images/1433036427223199748/QiPV4LYC_400x400.jpg"
            }
        });
        Root payload = new Root {
                            metadata_list = metadata_list
                        };

        string json = JsonUtility.ToJson(payload);
        byte[] rawJSON = new System.Text.UTF8Encoding().GetBytes(json);

        webRequestVar.uploadHandler = (UploadHandler) new UploadHandlerRaw(rawJSON);
        webRequestVar.downloadHandler = (DownloadHandler) new DownloadHandlerBuffer();

        //Set headers for the request
        webRequestVar.SetRequestHeader("Content-Type", "application/json");
        webRequestVar.SetRequestHeader("NAAS-APIKEY", "PASTE_YOUR_APIKEY_FROM_DASHBOARD");

        //Makes request
        yield return webRequestVar.SendWebRequest();

        if (webRequestVar.isNetworkError || webRequestVar.isHttpError)
            outputArea.text = webRequestVar.error + webRequestVar.downloadHandler.text;
        else
            outputArea.text = webRequestVar.downloadHandler.text;
    }
}
Important
One thing very important and to note here is how we’re using the metadata and first converting it to JSON, and then raw data to send through the API POST request.
After adding the script
You have added the script and understand how the script works.
You need to do the following:
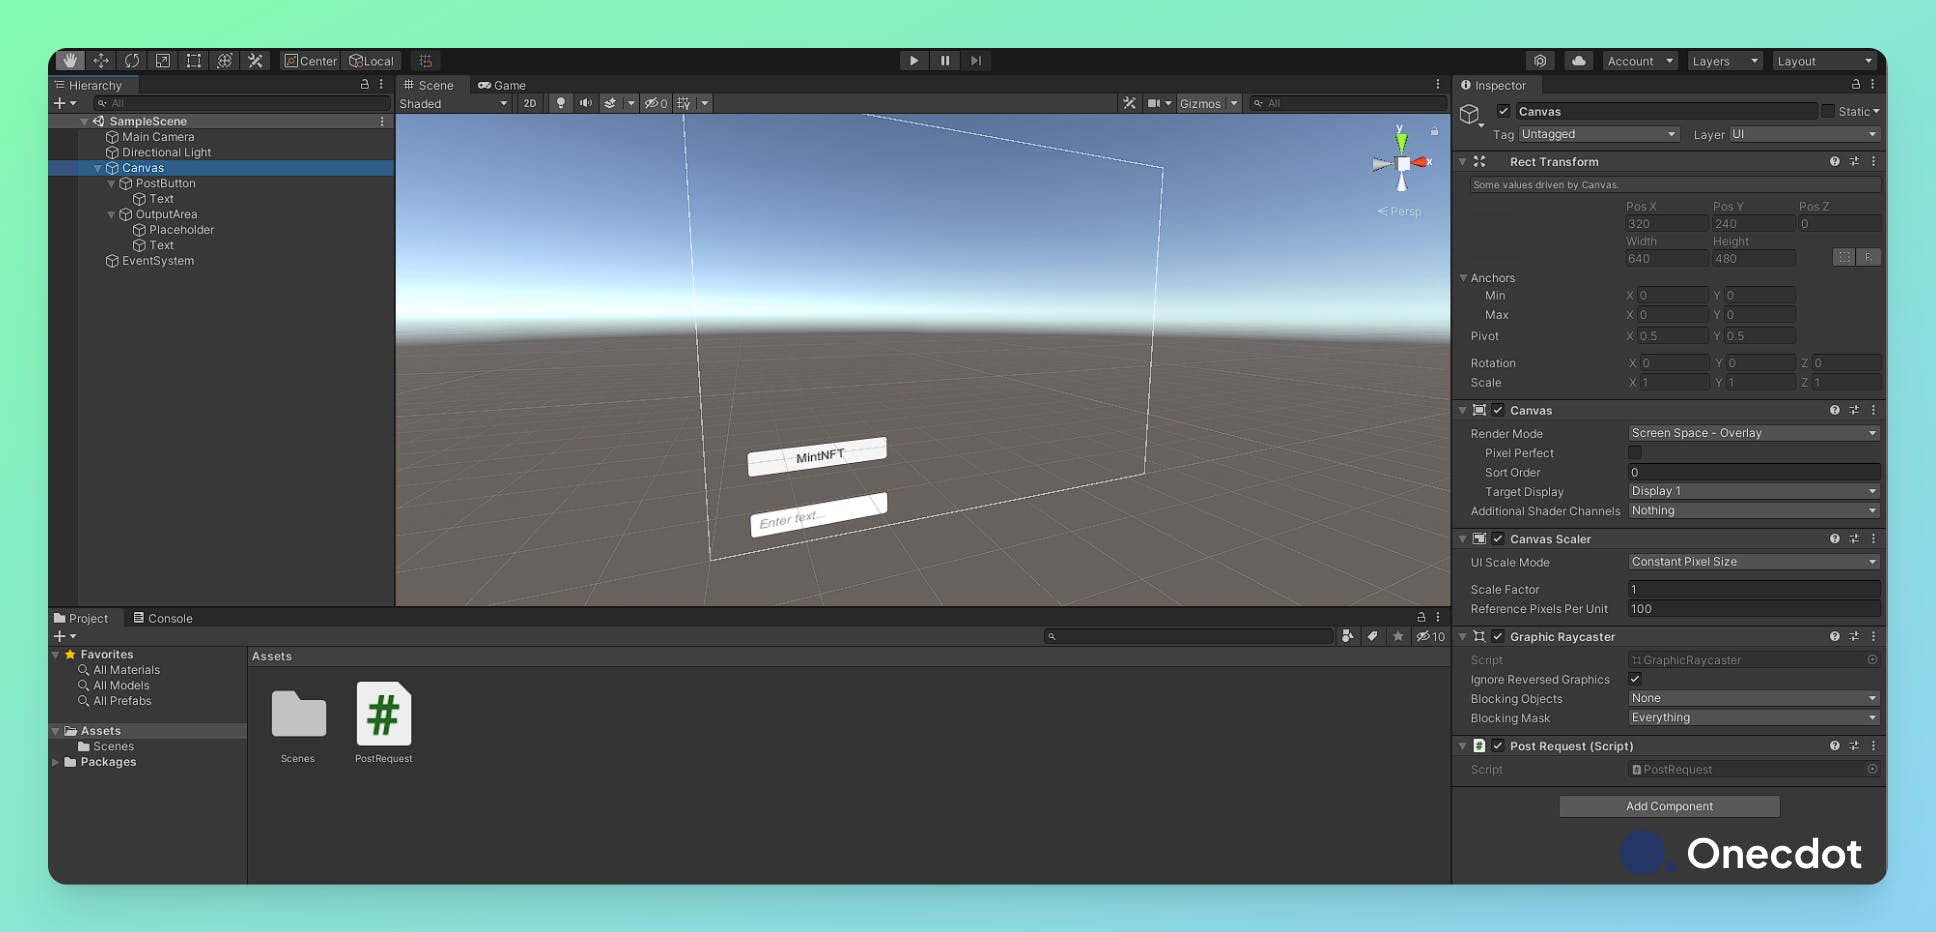
- Select
Canvasfrom the left siddrag-drop - Now drag-drop the
PostRequestscript file on the right side pane where the “Add component” button is present. - A compilation of scripts will be triggered
You’ve added the script in Component. Now run the game:
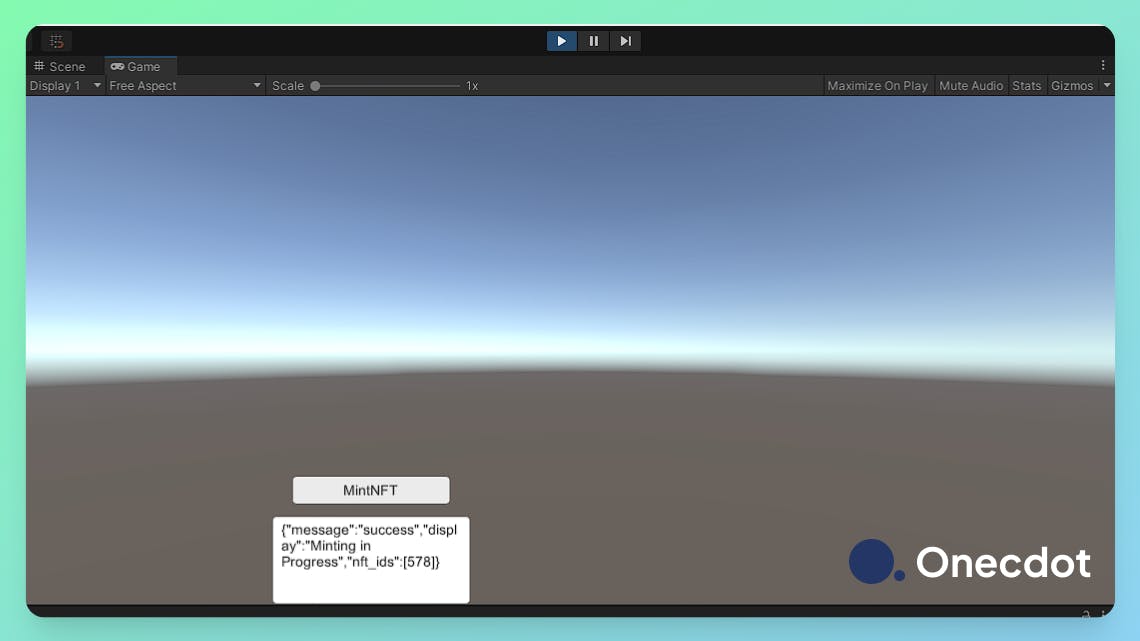
- On the top-middle, you’ll find the play-pause button. Click on the play button to run the game.
- You’ll now see the game running as follows

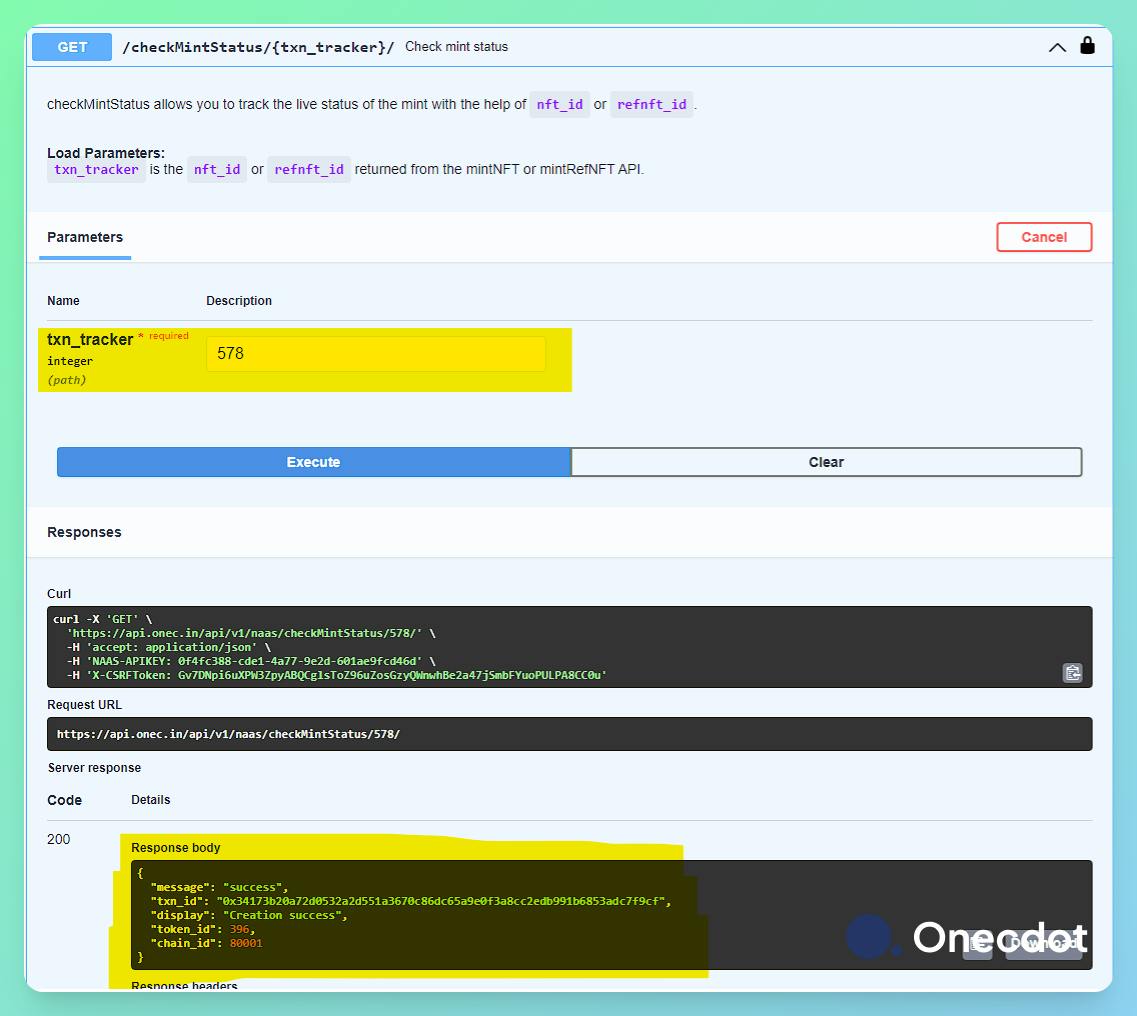
Now if you check it through the check mint status from the Swagger docs(You can use the same API key).
- Click on Authorize > Add the value for NAAS-APIKEY
- Unfold
checkMintStatus> Try it out and add thenft_idsfrom the response to thetxn_trackerto find your asset minted.

Amazingly simple no?
Onecdot aims to provide more solutions like these to ease the development experience for NFT based applications. Another product is Onec-SDK, which currently has the functionality for wallet authentication in 3 lines.
Check out the products here:
Onec-NAAS 👉 https://api.onec.in/docs/
Onec-SDK 👉 https://www.npmjs.com/package/onec-sdk
Onecdot functions as a LAB where the Developers, Advocates, Product Managers, Marketing people etc. are invited to build and ship cool products and write a great thesis.